How to Make a Calendar Cake
By using this site, you agree to our Terms of Use. This post may contain affiliate links. Read our disclosure policy.
Celebrate a special date with this creative calendar cake! Learn how to turn a simple sheet cake into a personalized calendar that highlights birthdays, anniversaries, due dates, and more.
Looking for a creative way to celebrate a special date? Whether it’s a birthday, anniversary, due date, or milestone moment, this DIY calendar cake is a charming (and delicious) way to mark the occasion!
Why a Calendar Cake?
A calendar cake is more than just dessert, it’s a visual countdown and a centerpiece all in one. Highlighting the special day on the cake brings extra meaning and uniqueness to your celebration.
Calendar Cake Ingredients:
- plain frosted sheet or square cake (any flavor, frosted smoothly)
- Piping bags with a small round tips
- Preferred color icings/frostings (you can use store bought or make your own)
- Wooden skewers (to create grid lines)
- Toothpick (optional for light grid marking)


Instructions:
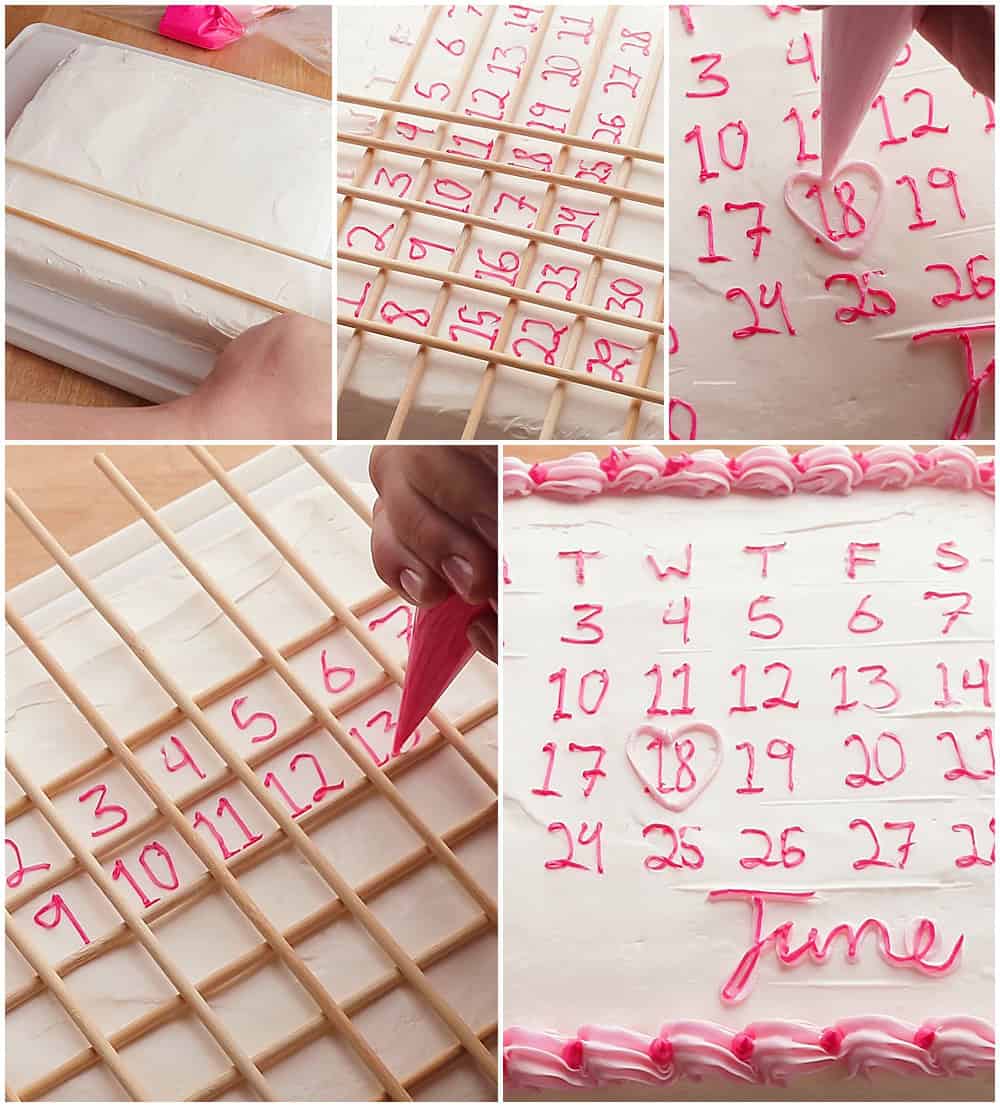
1. Prep Your Cake
Bake your favorite sheet cake ( or buy one) and let it cool completely. Frost it smoothly with a single color buttercream to make the calendar design pop.Just make sure your icing colors are contrasting e.g if chocolate frosting is used, use light colored frosting to add the calendar details.
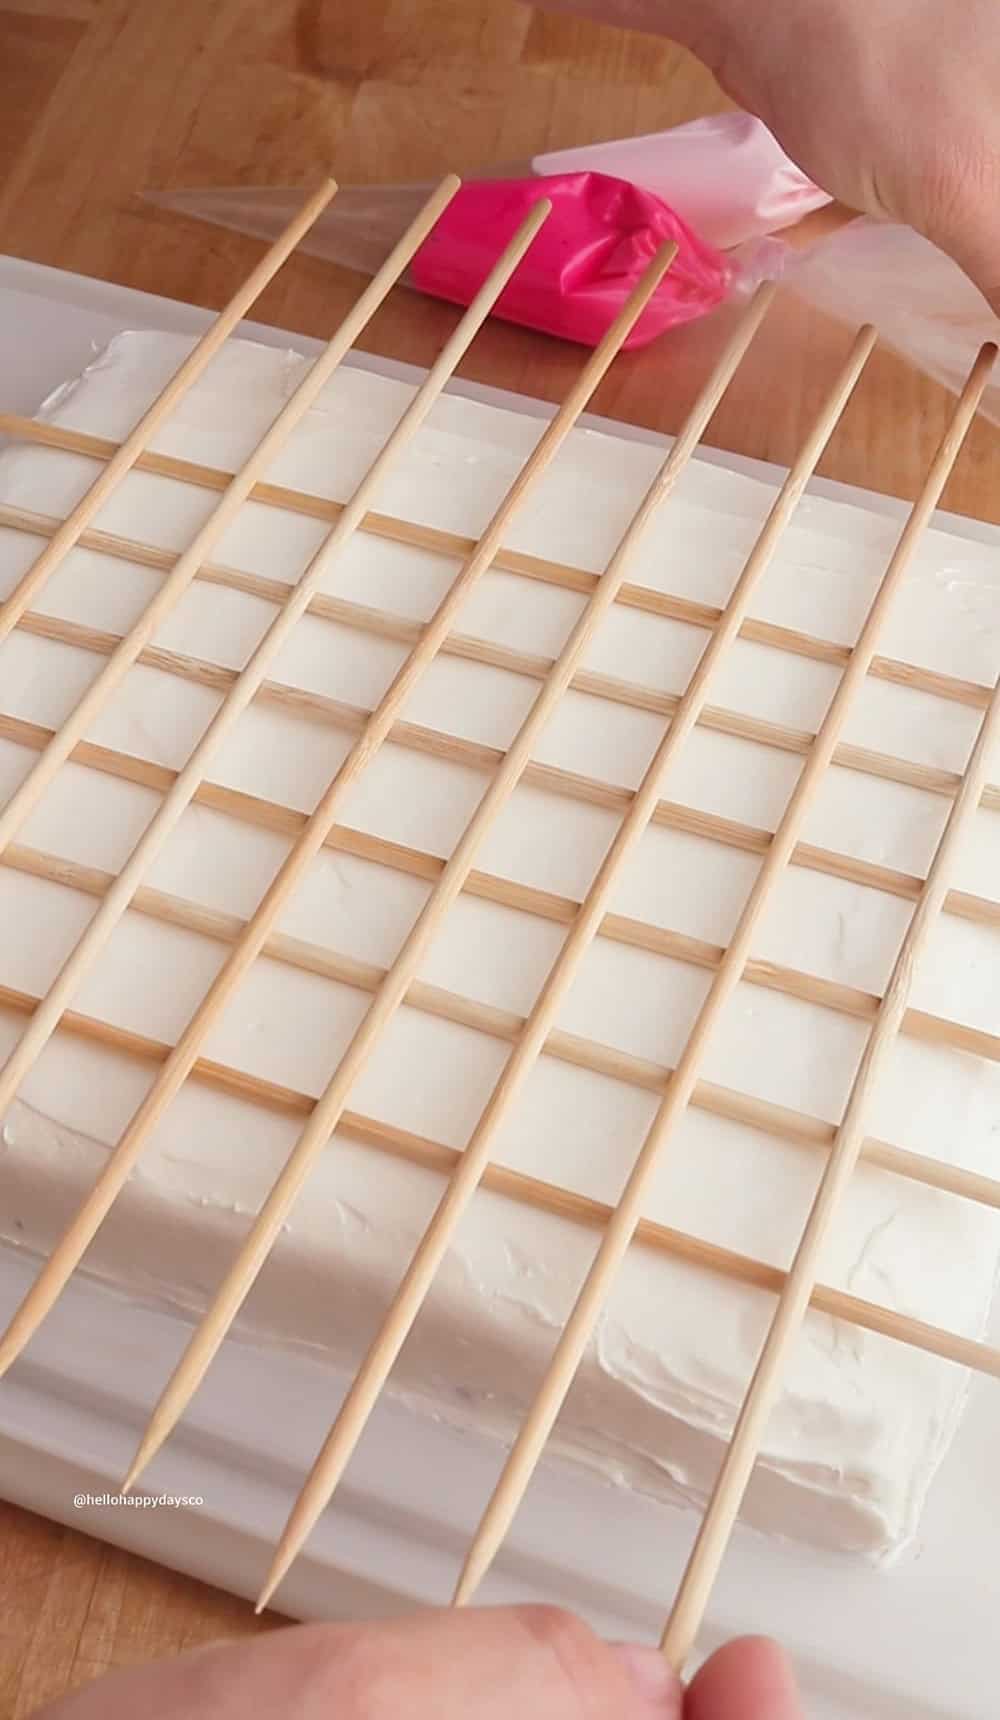
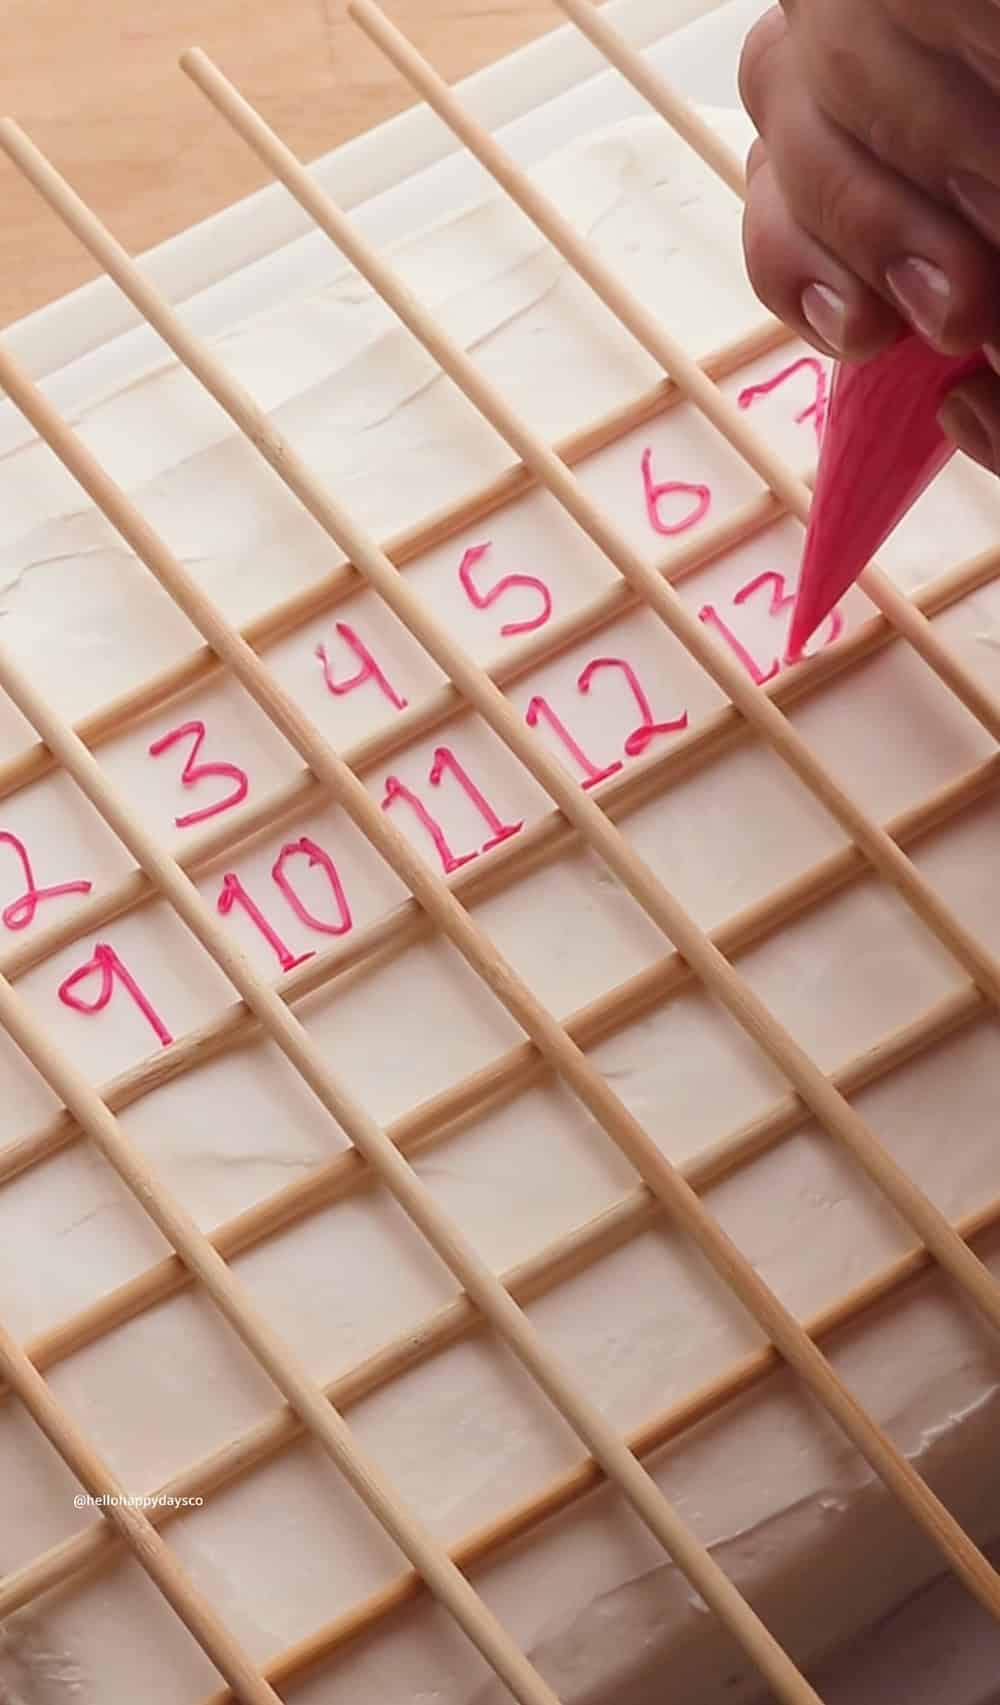
2. Create Your Calendar Grid
Lay wooden skewers horizontally and vertically over the cake to form a calendar grid. This helps keep your numbers evenly spaced. You can gently press down with a toothpick to leave faint grid marks as a guide if desired.
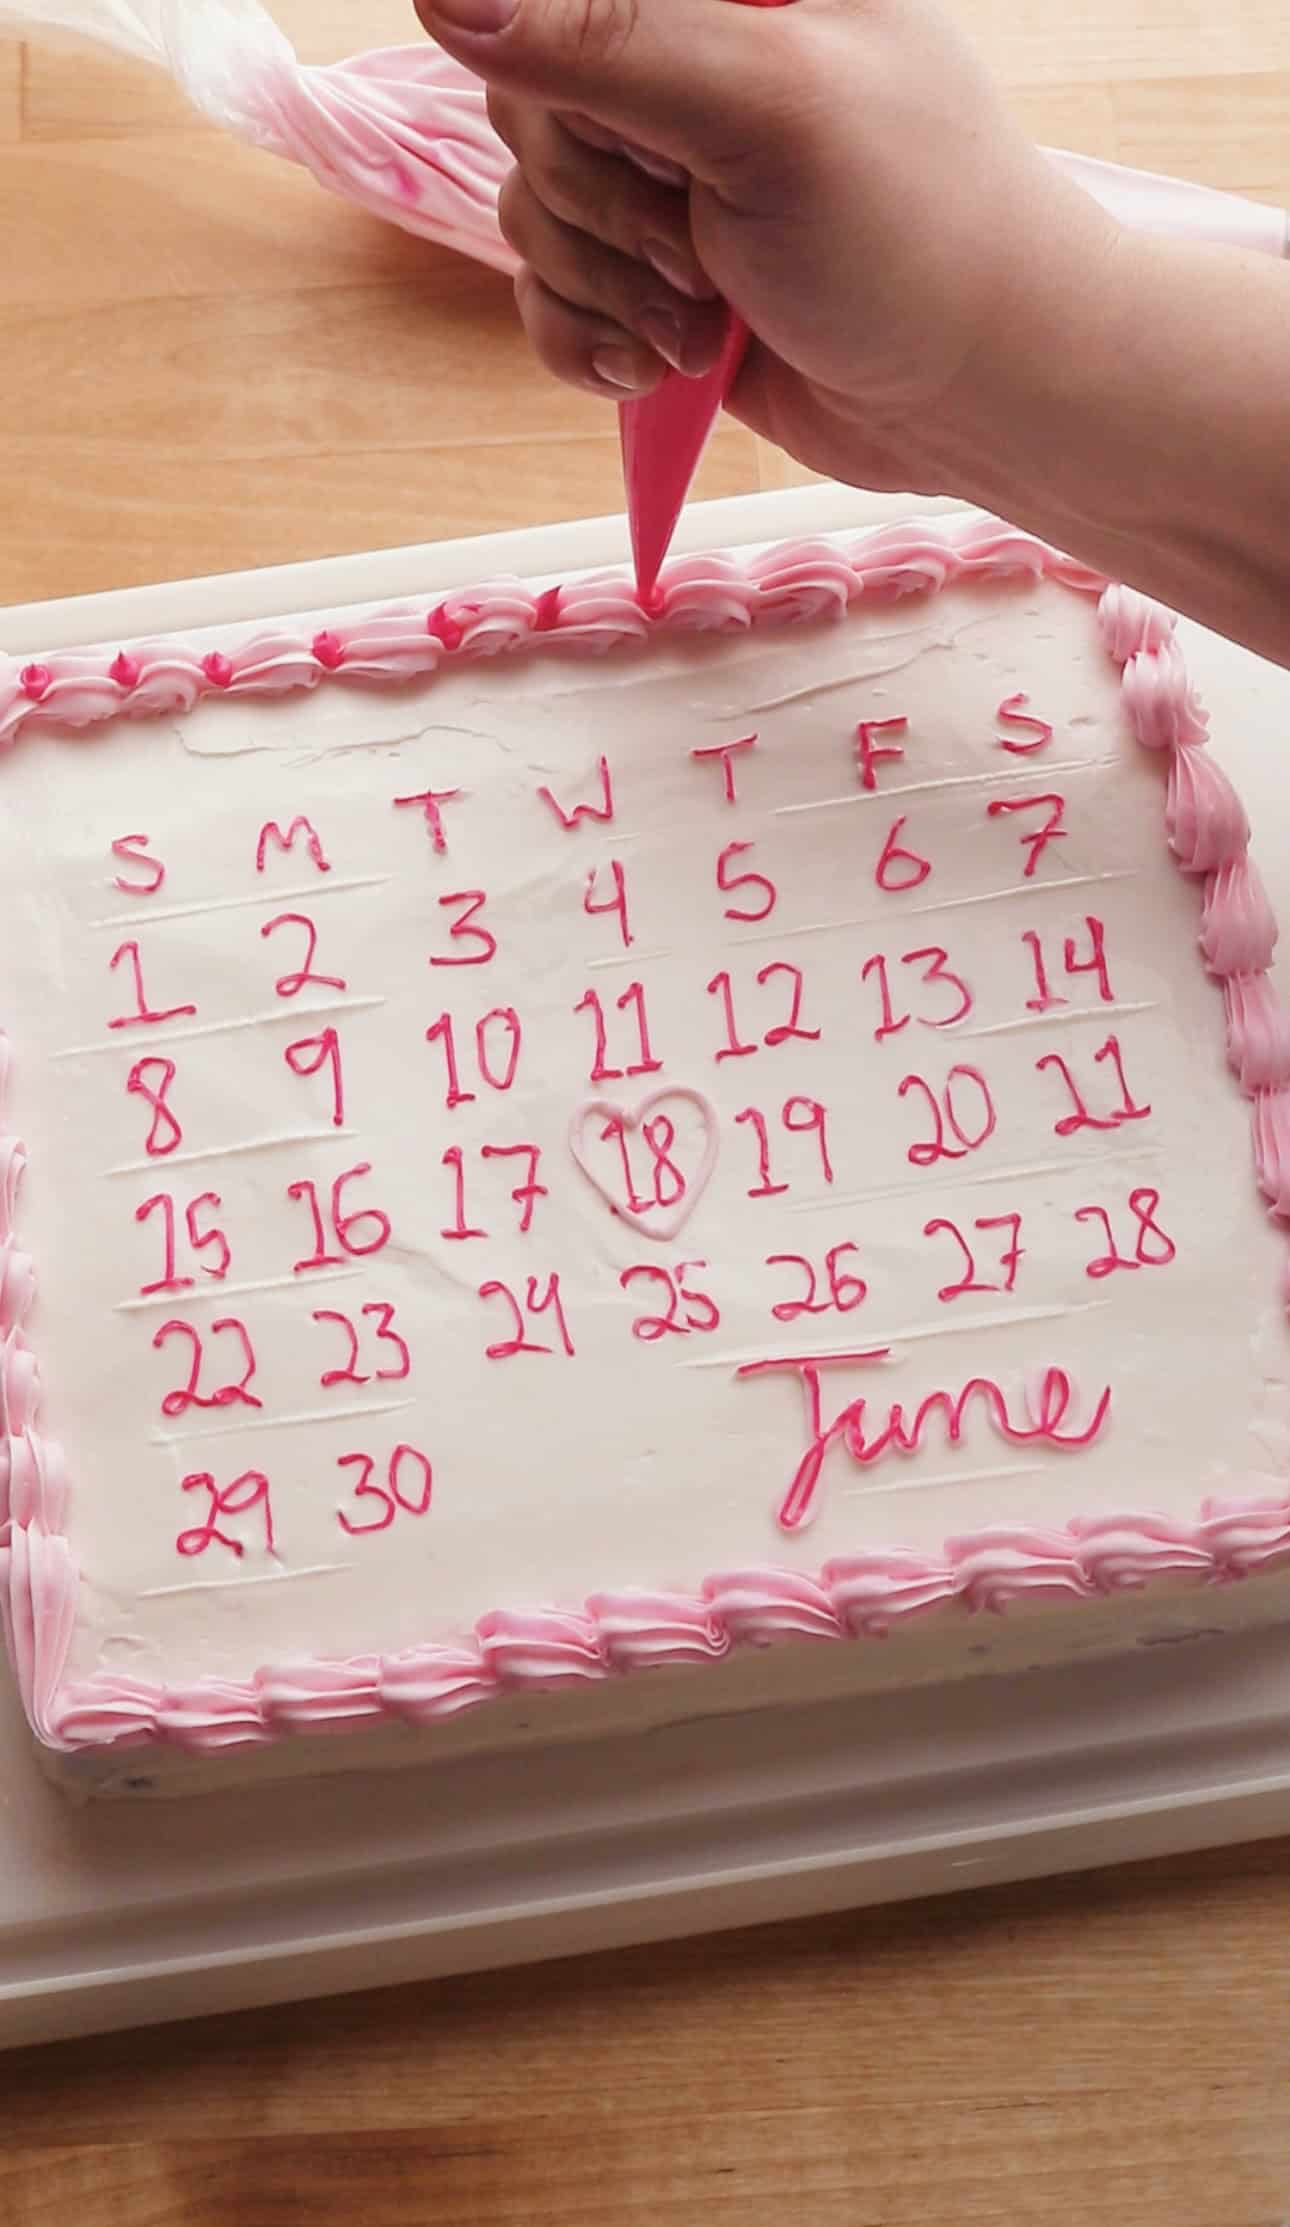
3. Pipe the Numbers
Using a piping bag fitted with a small round tip, pipe the month’s dates inside each box. Start with the first day of the month on the correct weekday. (In this example, June 1st starts on a Saturday.)
4. Highlight the Special Day
Draw a heart, circle, or circle around the date you’re celebrating. It’s a sweet way to show the reason for the cake!
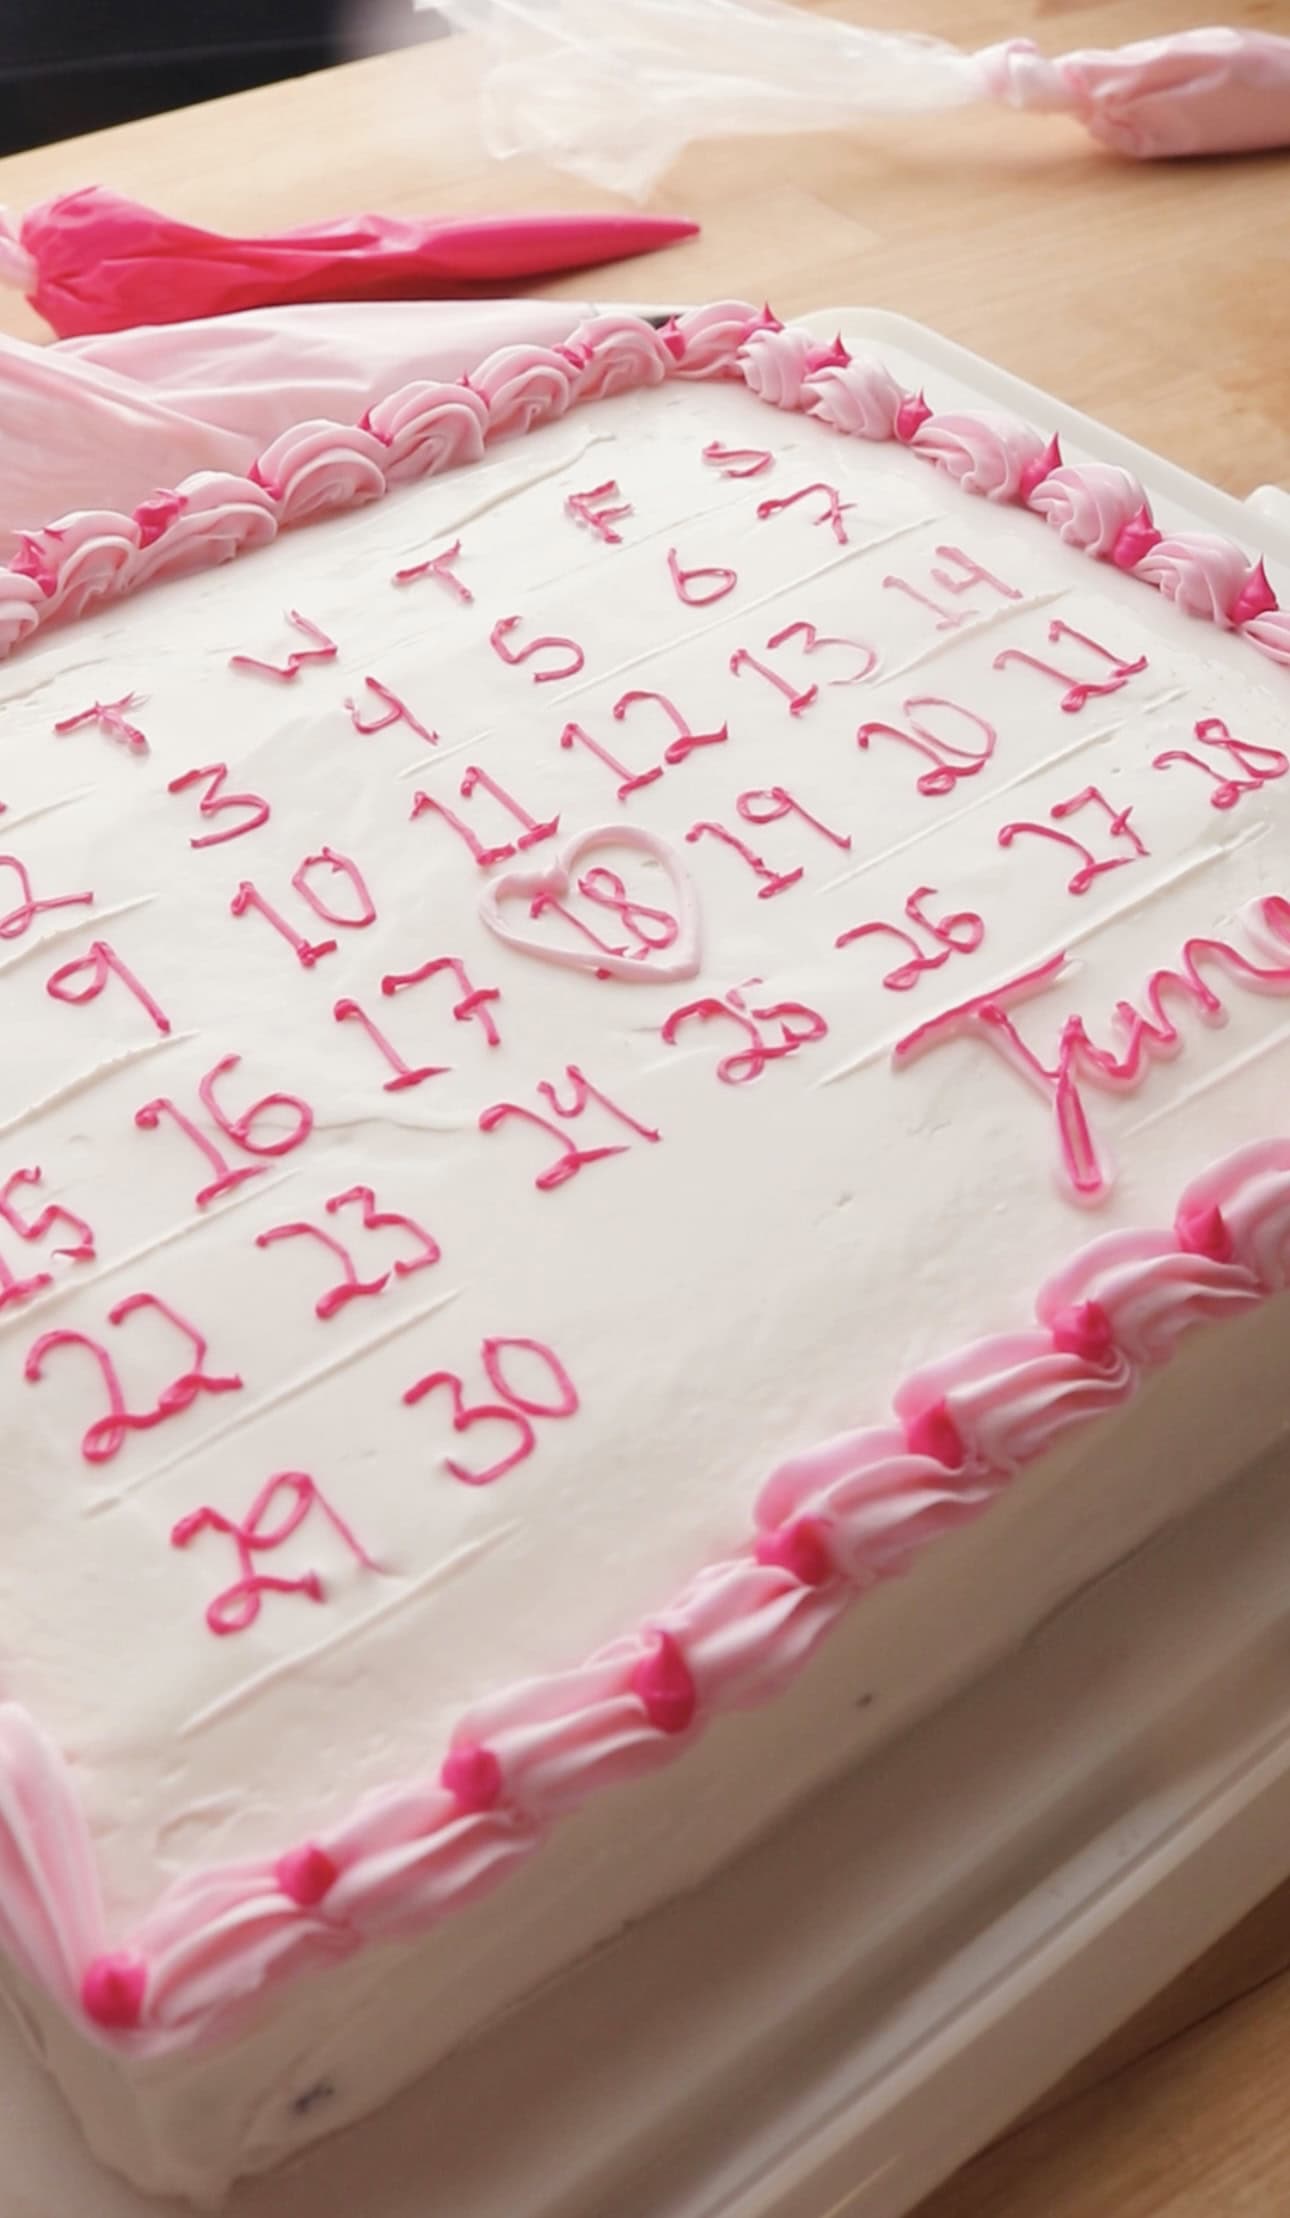
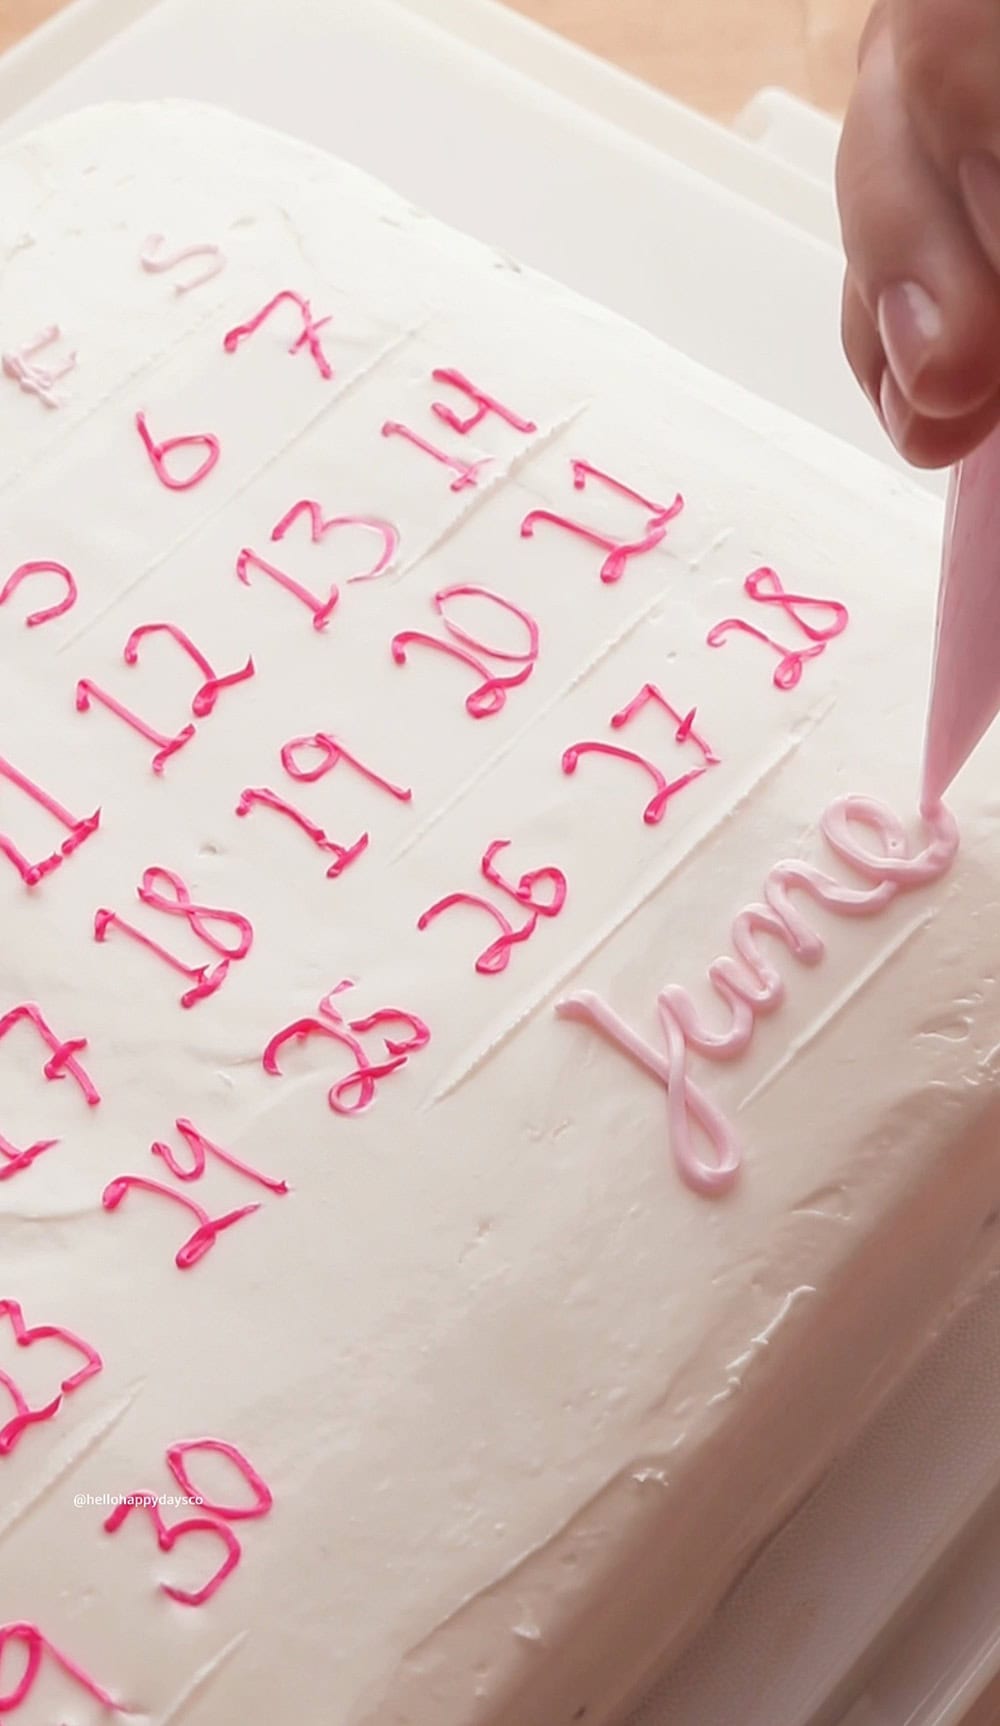
5. Add Details
Label the days of the week across the top and write the month at the bottom. Add border decorations or piped frosting swirls for a finished look.
Ideas for Using a Calendar Cake:
- Baby shower (highlight due date)
- Engagement reveal (mark proposal day)
- Retirement countdown
- Graduation or recital date
- Countdown to vacation
- Holidays e.g. Christmas
Tips:
- Chill the cake slightly before piping for firmer frosting and cleaner lines.
- Use gel food coloring for vibrant icing hues.
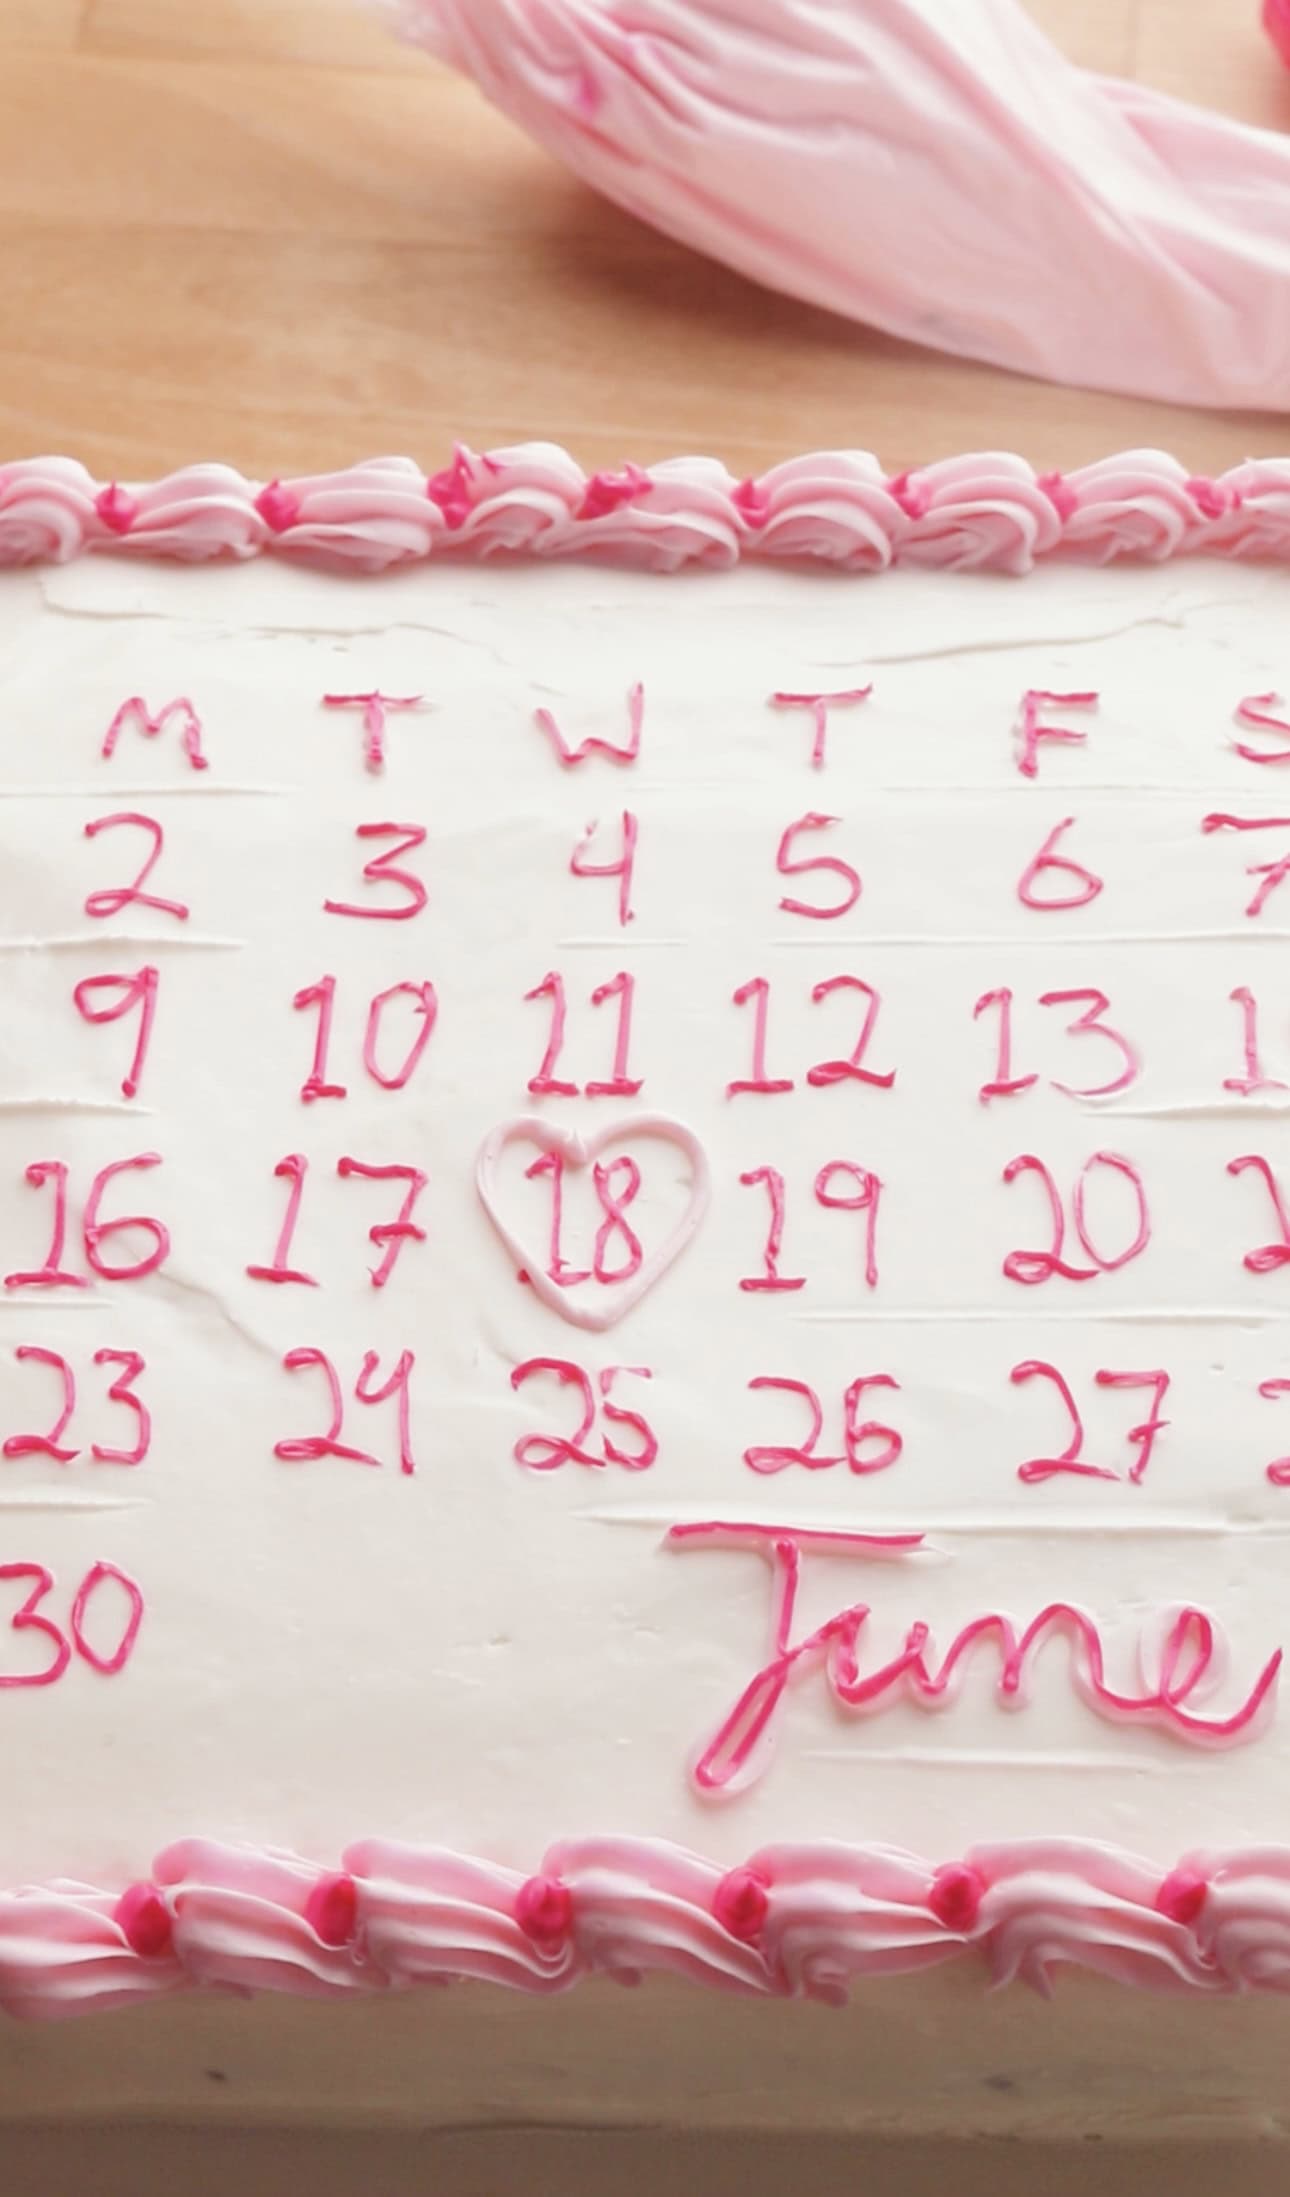
Final Thoughts
This calendar cake is an easy yet heartfelt way to turn any meaningful date into a memory. Who knew frosting and numbers could bring so much joy?
More fun cakes

Agnes Hsu is a mom of three and has been inspiring parents and kids to get creative with easy activities and family friendly recipes for over 10 years. She shares her love for creative play and kids food to her 2MM+ followers online. Agnes' commitment to playful learning and kindness has not only raised funds for charity but also earned features in prestigious nationwide publications.
- Agnes Hsu
- Agnes Hsu
- Agnes Hsu
- Agnes Hsu
- Agnes Hsu
- Agnes Hsu
- Agnes Hsu
- Agnes Hsu
- Agnes Hsu
- Agnes Hsu
- Agnes Hsu
- Agnes Hsu
- Agnes Hsu
- Agnes Hsu
- Agnes Hsu
- Agnes Hsu
- Agnes Hsu
- Agnes Hsu
- Agnes Hsu
- Agnes Hsu
- Agnes Hsu
- Agnes Hsu
- Agnes Hsu
- Agnes Hsu
- Agnes Hsu
- Agnes Hsu
- Agnes Hsu
- Agnes Hsu
- Agnes Hsu
- Agnes Hsu
- Agnes Hsu
- Agnes Hsu
- Agnes Hsu
- Agnes Hsu
- Agnes Hsu
- Agnes Hsu
- Agnes Hsu
- Agnes Hsu
- Agnes Hsu
- Agnes Hsu
- Agnes Hsu
- Agnes Hsu
- Agnes Hsu
- Agnes Hsu
- Agnes Hsu
- Agnes Hsu
- Agnes Hsu
- Agnes Hsu
- Agnes Hsu
- Agnes Hsu
- Agnes Hsu
- Agnes Hsu
- Agnes Hsu
- Agnes Hsu
- Agnes Hsu
- Agnes Hsu
- Agnes Hsu
- Agnes Hsu
- Agnes Hsu
- Agnes Hsu
- Agnes Hsu
- Agnes Hsu
- Agnes Hsu
- Agnes Hsu
- Agnes Hsu
- Agnes Hsu
- Agnes Hsu
- Agnes Hsu
- Agnes Hsu
- Agnes Hsu
- Agnes Hsu
- Agnes Hsu
- Agnes Hsu
- Agnes Hsu
- Agnes Hsu
- Agnes Hsu
- Agnes Hsu
- Agnes Hsu
- Agnes Hsu
- Agnes Hsu
- Agnes Hsu
- Agnes Hsu
- Agnes Hsu
- Agnes Hsu
- Agnes Hsu
- Agnes Hsu
- Agnes Hsu
- Agnes Hsu
- Agnes Hsu
- Agnes Hsu
- Agnes Hsu
- Agnes Hsu
- Agnes Hsu
- Agnes Hsu
- Agnes Hsu
- Agnes Hsu
- Agnes Hsu
- Agnes Hsu
- Agnes Hsu
- Agnes Hsu
- Agnes Hsu
- Agnes Hsu
- Agnes Hsu
- Agnes Hsu
- Agnes Hsu
- Agnes Hsu
- Agnes Hsu
- Agnes Hsu
- Agnes Hsu
- Agnes Hsu
- Agnes Hsu
- Agnes Hsu
- Agnes Hsu
- Agnes Hsu
- Agnes Hsu
- Agnes Hsu
- Agnes Hsu
- Agnes Hsu
- Agnes Hsu
- Agnes Hsu
- Agnes Hsu
- Agnes Hsu
- Agnes Hsu
- Agnes Hsu
- Agnes Hsu
- Agnes Hsu
- Agnes Hsu
- Agnes Hsu
- Agnes Hsu
- Agnes Hsu
- Agnes Hsu
- Agnes Hsu
- Agnes Hsu
- Agnes Hsu
- Agnes Hsu
- Agnes Hsu
- Agnes Hsu
- Agnes Hsu
- Agnes Hsu
- Agnes Hsu
- Agnes Hsu
- Agnes Hsu
- Agnes Hsu
- Agnes Hsu
- Agnes Hsu
- Agnes Hsu
- Agnes Hsu
- Agnes Hsu
- Agnes Hsu
- Agnes Hsu
- Agnes Hsu
- Agnes Hsu
- Agnes Hsu
- Agnes Hsu
- Agnes Hsu
- Agnes Hsu
- Agnes Hsu
- Agnes Hsu
- Agnes Hsu
- Agnes Hsu
- Agnes Hsu
- Agnes Hsu
- Agnes Hsu
- Agnes Hsu
- Agnes Hsu
- Agnes Hsu
- Agnes Hsu
- Agnes Hsu
- Agnes Hsu
- Agnes Hsu